

- Academic Technology
We Thought Of Everything You Need To Consider For Recording Lectures On Campus So You Don’t Have To (Part 3)
With today’s lecture capture systems, virtually any room can be provisioned for video with a simple flick of a switch. From large auditoriums to smaller classrooms, or from dedicated labs and practice spaces to faculty offices, creating a baseline video capture setup can be as easy as downloading the appropriate software to a computer and plugging a camera into a USB port.
That, however, doesn’t mean that lecture capture can or should be deployed the same way in every instance. To get the best results, you’ll want to plan for the practical realities of recording in each space you provision.
Last week, in Part II of our lecture capture setup series, we took a deep dive into the types of technical equipment — hardware, video cameras, microphones and more — needed to set up video capture in various settings around campus. This week, in our final post about everything you need to know for lecture capture, we show you examples and diagrams of lecture capture setups in particular rooms for a variety of uses, not limited to lecture capture.
If you’d like to read our e-book in its entirety you can download our 50+ page guide to setting up lecture capture anywhere on campus here.
Click below to jump to a specific lecture capture setup example:
- Standard Classroom Setup: Lecture-Based Course
- Standard Classroom Setup: Discussion or Seminar Course
- Large Lecture Hall or Auditorium Setup
- Large Lecture Hall or Auditorium Setup: Distributed Recording
- Faculty Office Space
- In The Lab
- In The Field
- Demonstration Spaces
- Student Presentations
Lecture Capture Setup Examples and Diagrams
EXAMPLE 1. Standard Classroom Setup: Lecture-Based Course
The vast majority of lecture capture implementations will take place in what can be considered a traditional or standard classroom. While few of these are ever perfectly alike (even within a single building), most are generally 400-600 square feet (37-55 square meters) in size and are optimized for 15-35 students depending on seating arrangement.
Our first two examples of how to implement lecture capture will address this prototypical classroom — first, for primarily lecture-based curricula, and second, for primarily discussion-based curricula.
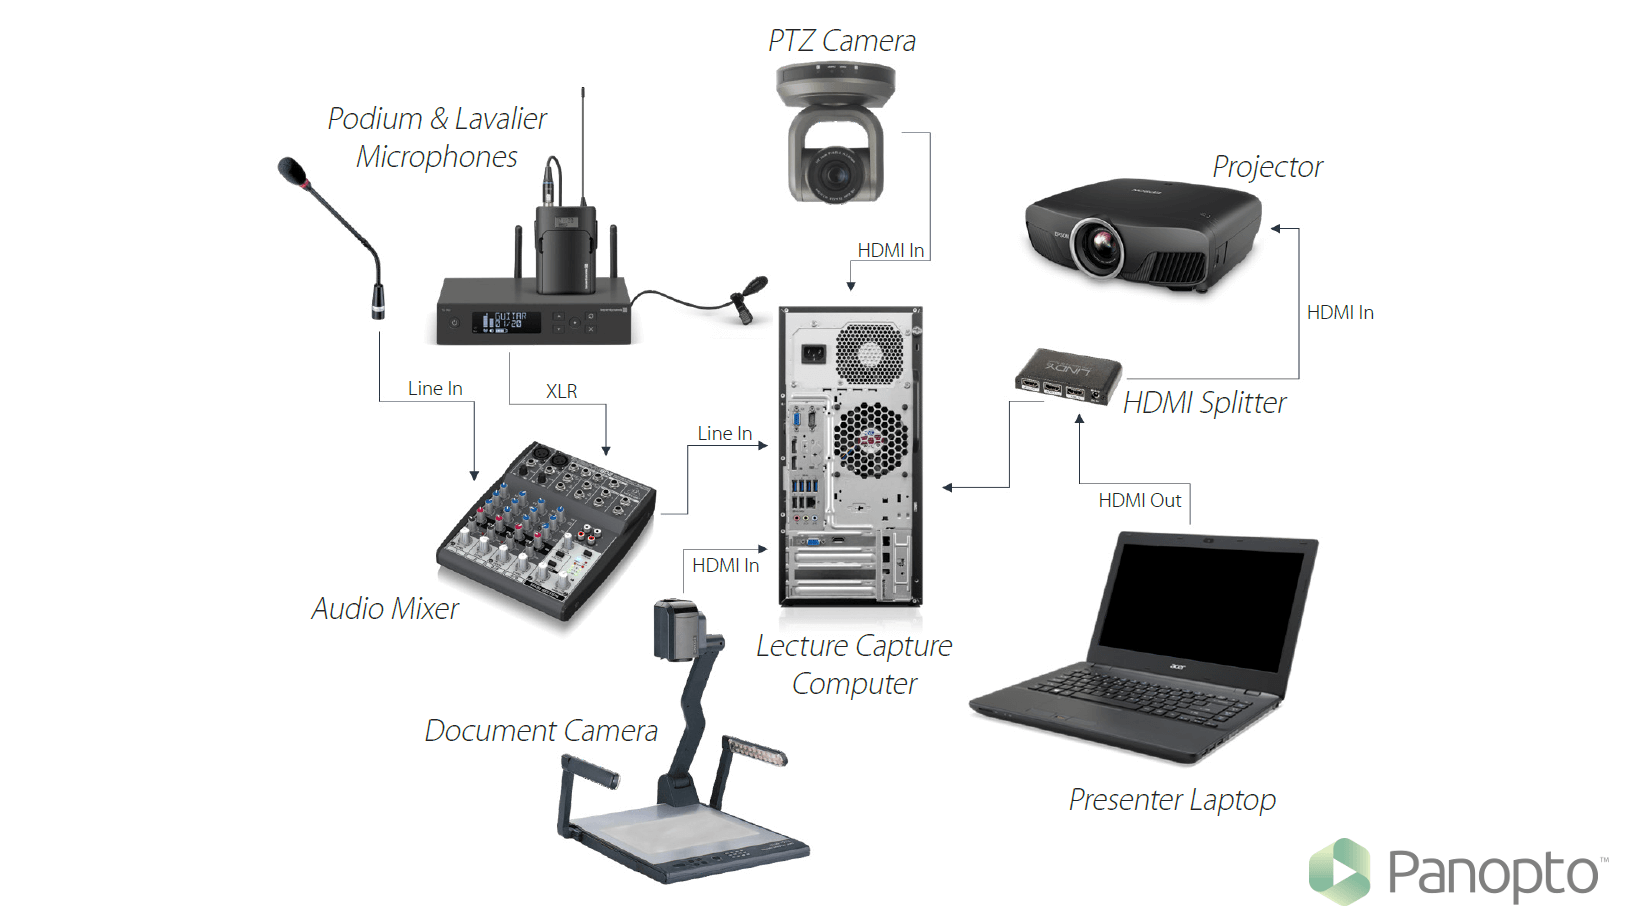
In this first example, we’ll assume the instructor will most often be presenting at the front of the class, and that the classroom has already been equipped with a projector.
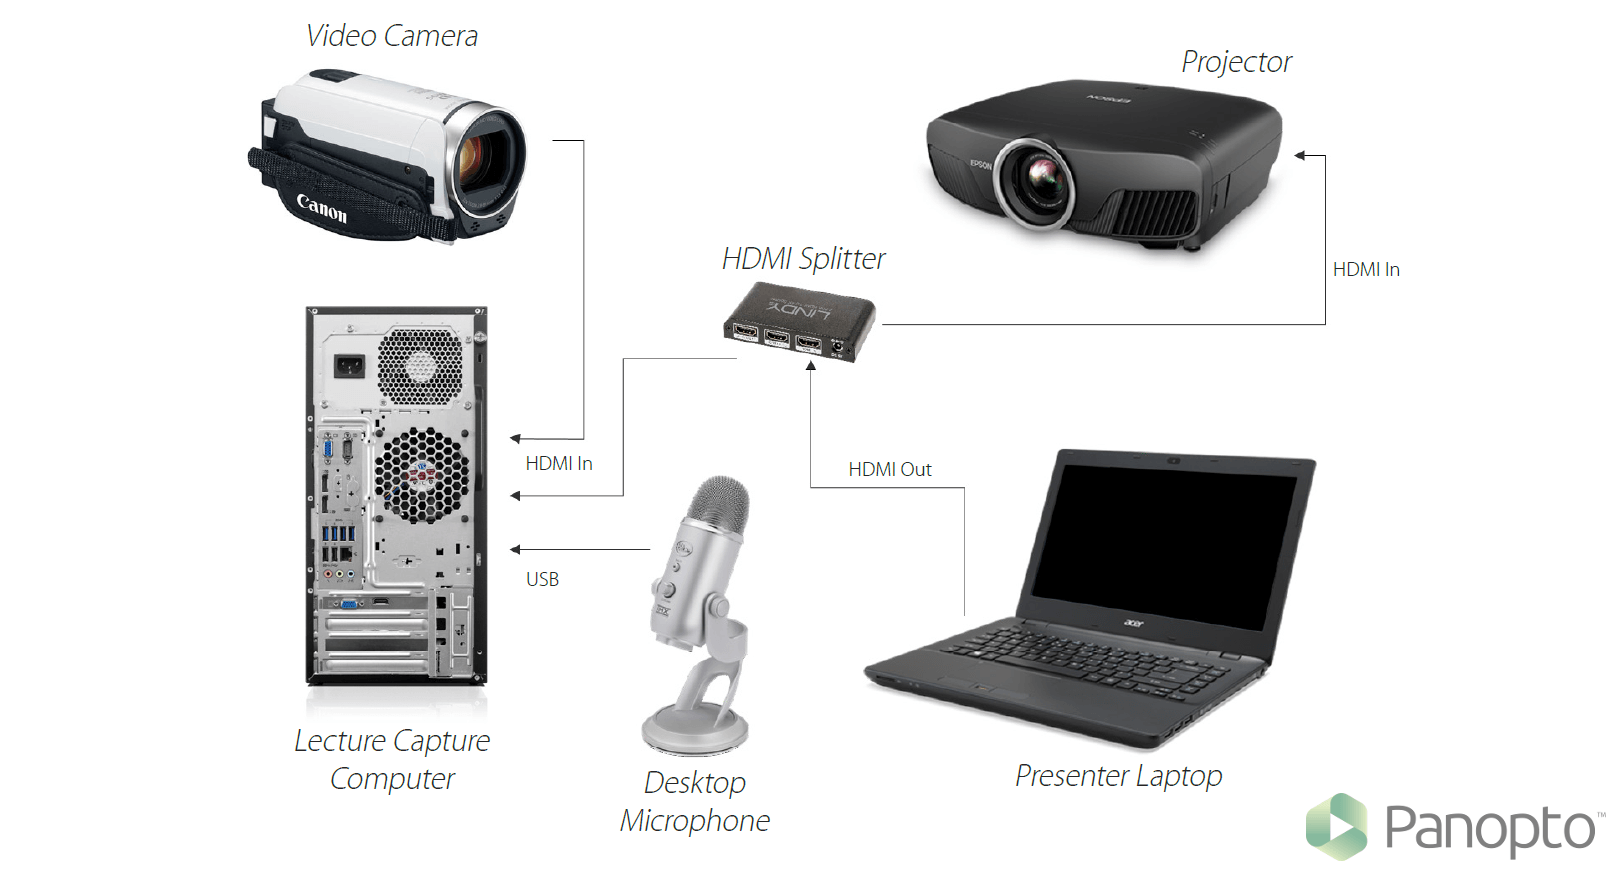
In this example, you’ll want to start by provisioning the classroom with a computer (if one does not already exist) and installing your lecture capture software on that machine.
The small size of the room should limit the mobility of your instructors. As such, you’ll be able to set up a camcorder to record relatively close up video in a specific spot (typically at the podium, although any open area near the front but not too close to the screen where slides will be shown is fine). Additional webcams or camcorders can be positioned as desired to capture the board or any in-classroom demonstrations or activities. You can set up a desktop or podium mic in that space as well to ensure high audio quality.
If your instructors would prefer greater mobility, simply position your camera further back in the room to capture a wider field of view, and offer lapel mics to ensure audio is captured. Boundary microphones at the front of the room can be useful as a fail-safe for audio in case there are technical issues with the lavalier mic, but you will also require an audio mixer. Remind instructors not to present in front of or near the projector screen.
Next, you’ll then want to check to see if the machine already has ports for the audio and video tools of your choice and to add capture cards or other converters if necessary. Once you are able, connect all of your video and audio recording devices directly to the classroom computer.
Finally, connect both your classroom lecture capture computer and your projector to an HDMI video splitter, and provide an additional cable so that instructors will be able to connect their own laptops to the splitter as well upon entering the room. This will enable your instructors to use their own laptops to both present and record their lectures simultaneously.
Basic Lecture Capture System Connections, Diagrammed: Standard Classroom
Sample Recording of a lecture recorded with Panopto in a standard classroom:
EXAMPLE 2. Standard Classroom: Seminar or Discussion Course
 In this second example, we’ll assume that instead of class time being oriented around a traditional lecture, the room will most often be used for open discussion and active learning.
Here, we’ll also assume the same standard size classroom from example one, with seating for up to about 30 students, and a projector already installed. This is a seminar space with a circular seating arrangement designed to support instructor-led discussions in class.
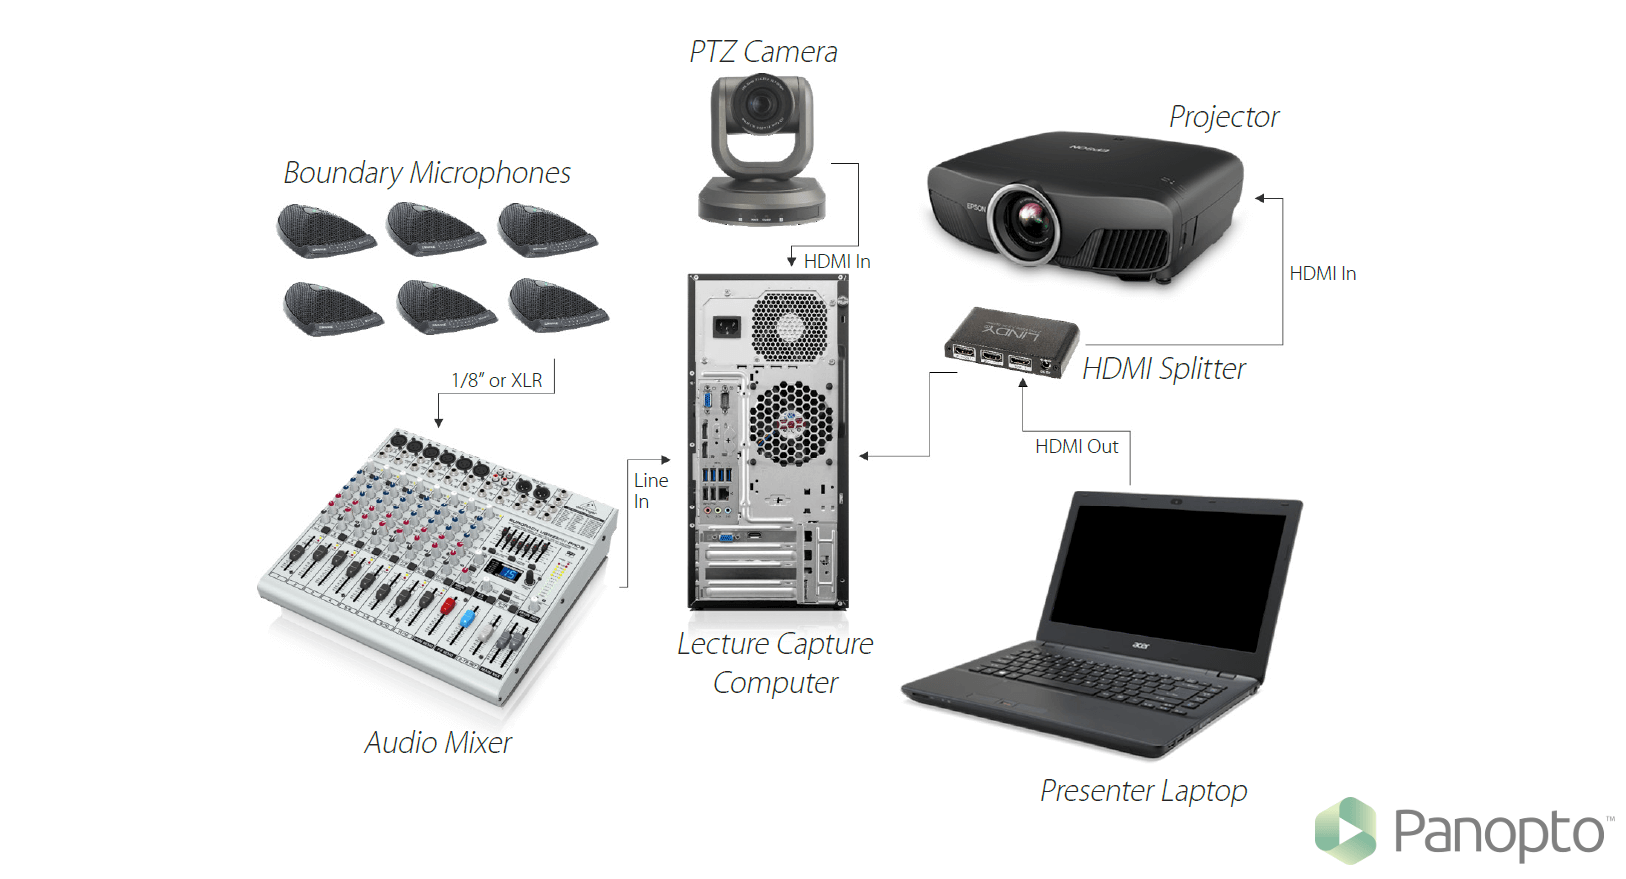
As before, you’ll want to start by provisioning the classroom with a computer (if one does not already exist) and installing your lecture capture software on that machine.
To capture a classroom-wide discussion, you’ll want to position your primary camera to capture as much of the room as possible. Talk with your instructors to understand if there is anything
specific they may want to capture as well, such as slides, a board, or a dedicated space in the room for in-class activities like demonstrations, presentations, experiments, role-play sessions, or anything else. You’ll connect both your primary camera and any secondary recording devices directly to your lecture capture computer.
Because audio can and will come from any corner of the room, you’ll want to set up boundary microphones and an audio mixer to ensure sound will be clearly and consistently recorded everywhere in the room. Connect your microphones to your mixer, and connect the mixer to the lecture capture system.
Finally, as before, connect your lecture capture computer and your projector to a video splitter, and provide an additional cable so that instructors can connect their own laptop to the system. This setup will capture clear audio and video of both the presenter and students during in-class discussions.
Basic Lecture Capture System Connections, Diagrammed: Seminar or Discussion Course
EXAMPLE 3. Large Lecture Hall or Auditorium
While fewer in number than standard classrooms on most campuses, large lecture halls designed to seat up to 200 or more students are often the first environment that springs to mind when teams begin thinking about implementing a lecture capture solution. And that’s for good reason — these larger spaces will require a bit more planning in order to ensure they are well provisioned.
In this first example, we’ll walk through provisioning your lecture hall with a single lecture capture computer or appliance. We’ll assume your lecture hall is large, with auditorium-style seating for 250 students. We’ll also assume that such a large classroom has already been outfitted with a projector, along with handheld or lapel microphones (ideally with a podium mic as a fallback) that all feed into an audio mixer, so that instructors needn’t shout to be heard.
You’ll want to begin by provisioning the classroom with a computer (if one does not already exist) and installing your lecture capture software on that machine. In this larger room, it will be
best to house this computer in the lectern or otherwise near the front of the class. Alternatively, if you’ll be using an appliance, you’ll want that installed similarly near the front. Either way, you’ll need to confirm the solution is able to connect with the feeds from your audio mixer and the camera(s) you intend to use, or that you’ve added a capture card in order to record those sources.
Whether it’s a formal stage or simply an open area up front, large halls typically have more space for instructors to move around as they present. As such, your primary camera should be able to record a wider view to ensure nothing is missed. If you have teaching assistants available or a dedicated AV team, a PTZ camera is usually easy to operate and will allow for panning and zooming to record your instructors up close.
Along with your primary camera, you’ll want to ensure any other recording tools like document cameras or other secondary cameras are all plugged into your lecture capture computer or are connected via capture card. As always, test to ensure everything records as expected.
Finally, as before, connect your lecture capture computer and your projector to a video splitter, and provide an additional cable so that instructors can connect their own laptop to the system.
If your presenters will manually begin recording once they’ve connected their laptop, the only step required will be to click “record” on your lecture capture system. If instead the classroom is remotely scheduled to record the lecture, all the instructor will need to do is connect his or her laptop and begin presenting.
As a failsafe, some schedulable lecture capture solutions even offer an “on-air” light you can connect that will provide a visual cue to let the instructor know that the room is recording properly.
Altogether, this setup will capture clear audio and video of the presenter, who is free to walk the front of the room, while minimizing background noise.
Basic Lecture Capture System Connections, Diagrammed: Large Lecture Hall or Auditorium
Sample Recording of a lecture recorded with Panopto in a lecture hall:
EXAMPLE 4. Large Lecture Hall or Auditorium: Distributed Recording
Often, the greatest challenge to provisioning a large lecture hall for video capture is simply connecting everything together. Whereas camera, microphone, computer, and presenter may be all located in a relatively small area in a traditional classroom, larger rooms have quite a bit more space to plan for.
Traditionally, these spaces have required significantly more investment in order to produce useable lecture recordings. Multiple cameras may be set up to capture the stage from different angles along with secondary devices to capture the board or demonstrations. Audio may require handheld or lapel mics, backup table mics, and typically, boundary mics for backup when the scheduled
content calls for all-room recording.
Tying all these tools together would be video and audio mixers, signal converters, and a staggering length of cable. These connections drive up the cost and increase the complexity of recording in large rooms.
The concept of distributed recording is designed to mitigate some of the complexity and cost of those physical connections, using the computing power of your lecture capture tools and the cloud instead. With distributed recording, video and audio feeds can be captured on separate machines and then synced in the cloud. This has two important benefits. First, it dramatically reduces the amount of cable required to provision your room. Second, because modern lecture capture systems perform signal detection and conversion, it eliminates the need for hardware-based signal converters.
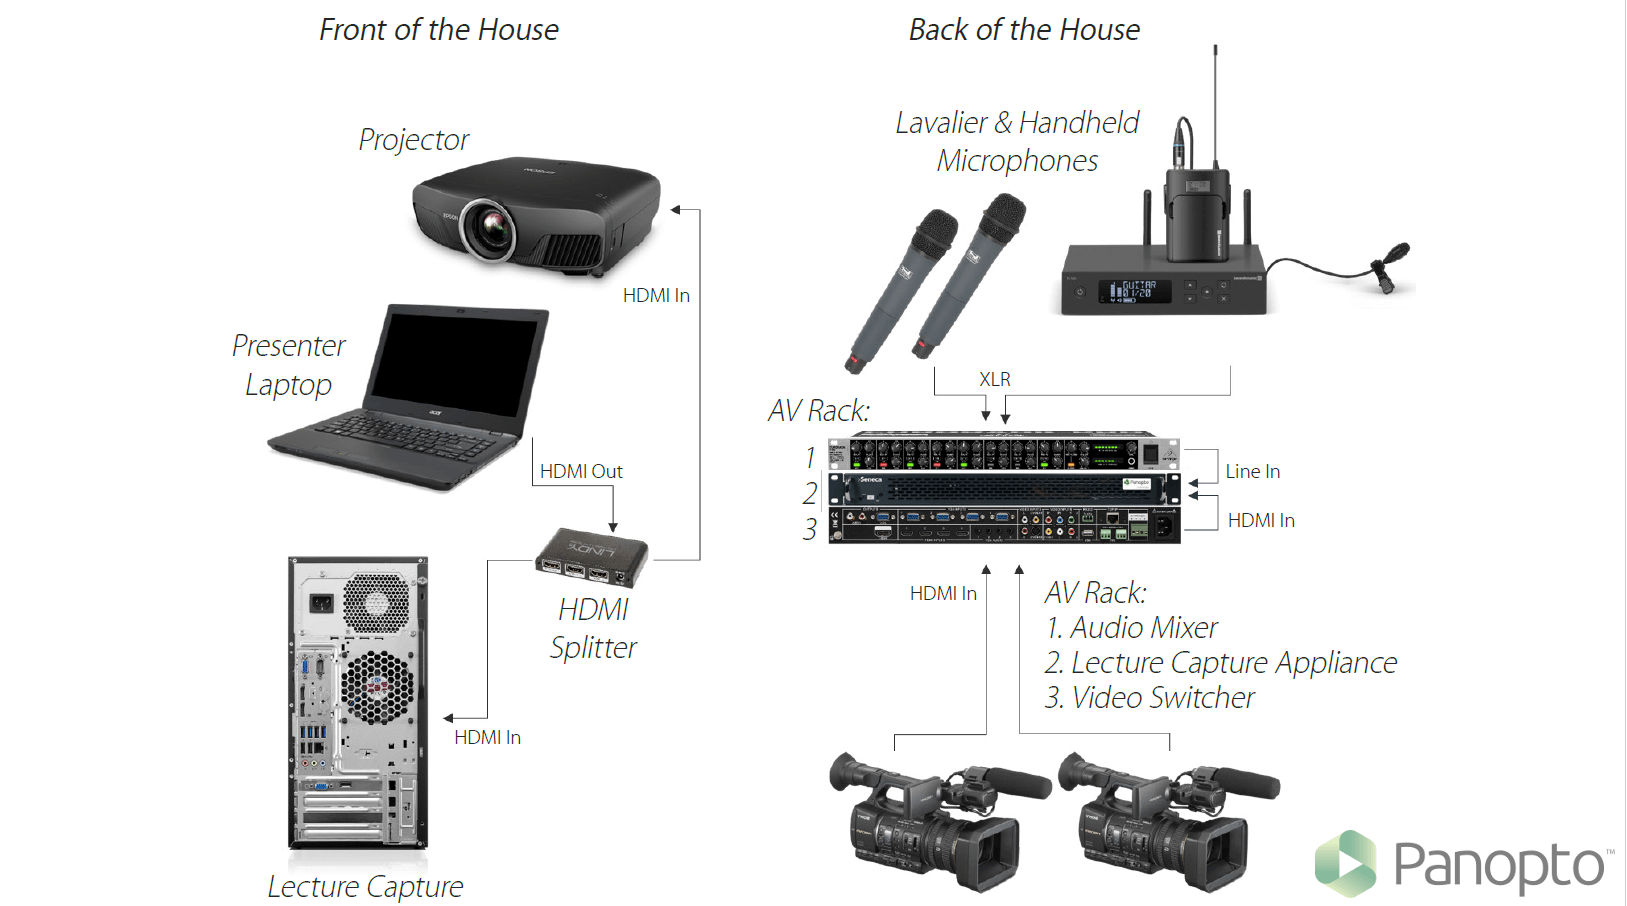
To provision a room for distributed recording, begin by mentally dividing the room into two or more segments. In this example, we’ll use the traditional “Front of House” and “Back of House” designations, covering the tools we’ll use on the stage and further back in the classroom, respectively.
In the back of the house is a rack-mount lecture capture appliance that resides in your auditorium’s AV room. Here, it can capture feeds from the sound mixing board already set up in the auditorium. You’ll also connect the camera(s) set up in the back of the auditorium to this lecture capture appliance.
In the front of the house, you’ll want to set up a separate lecture capture computer, connected by video splitter to your projector and ready with a cable for your instructors to connect their own laptops to the system.
To bring everything together, you’ll set both lecture capture computers to record into the same video session – this capability is built into lecture capture systems that support distributed recording. Your lecture capture solution will then do the heavy lifting of synchronizing your feeds. Note that this setup works equally well for live and on-demand video.
Basic Lecture Capture System Connections, Diagrammed: Distributed Recording
EXAMPLE 5. Faculty Office Space
In our first four examples, we’ve reviewed how lecture capture can be implemented in some of the most common learning spaces. However, as today’s instructors continue to find more valuable applications for video in the learning experience, restricting lecture capture solely to classrooms simply isn’t wise.
As the flipped classroom pedagogy sweeps through higher education, many instructors have begun to seek out efficient tools for capturing and sharing pre-class instructional materials. Your lecture capture software can be a perfect tool for this use.
The following is an example of a lecture capture setup in a faculty office space, where the teacher will be recording a video for students to review. These recordings may be used for distance education or flipped classrooms, or could be simple communications intended to guide study and prepare for exams.
Related Reading: The Complete Guide To Flipping Your Classroom
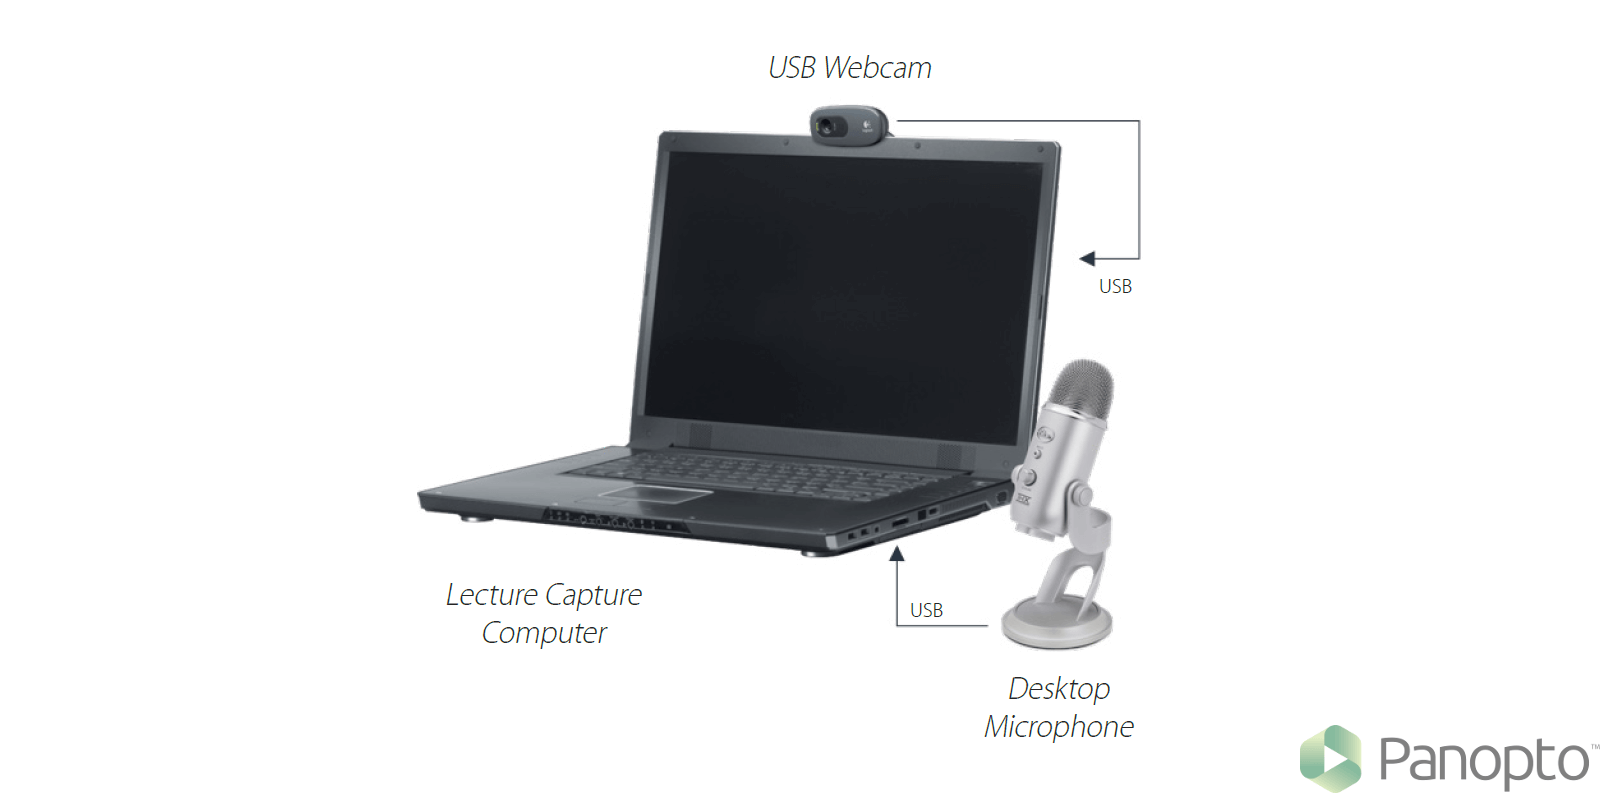
In this example, lecture capture software simply needs to be installed on the teacher’s laptop. Often, the laptop will already have built-in video and audio recording tools, but to get the best recording quality possible, an external HD webcam and a desktop microphone can be added.
To record, the instructor needs only to bring up his or her slides (or other content to capture and share on-screen), check the lighting in the room, and press record.
Basic Lecture Capture Connections, Diagrammed: Faculty Office Space
Sample Recording of a lecture recorded with Panopto in an office:
EXAMPLE 6. In The Lab
While faculty offices will likely be the most common non-classroom locations you’ll need to be ready to provision for lecture capture, over time, nearly every space dedicated to study and learning will likely make its way onto your list.
Increasingly, institutions are finding that implementing lecture recording tools in labs and other dedicated research facilities provides faculty with an easy way to record and share demonstrations without having to reproduce those demonstrations in an ill-equipped classroom — enriching students’ learning experiences without creating new cost or safety concerns.
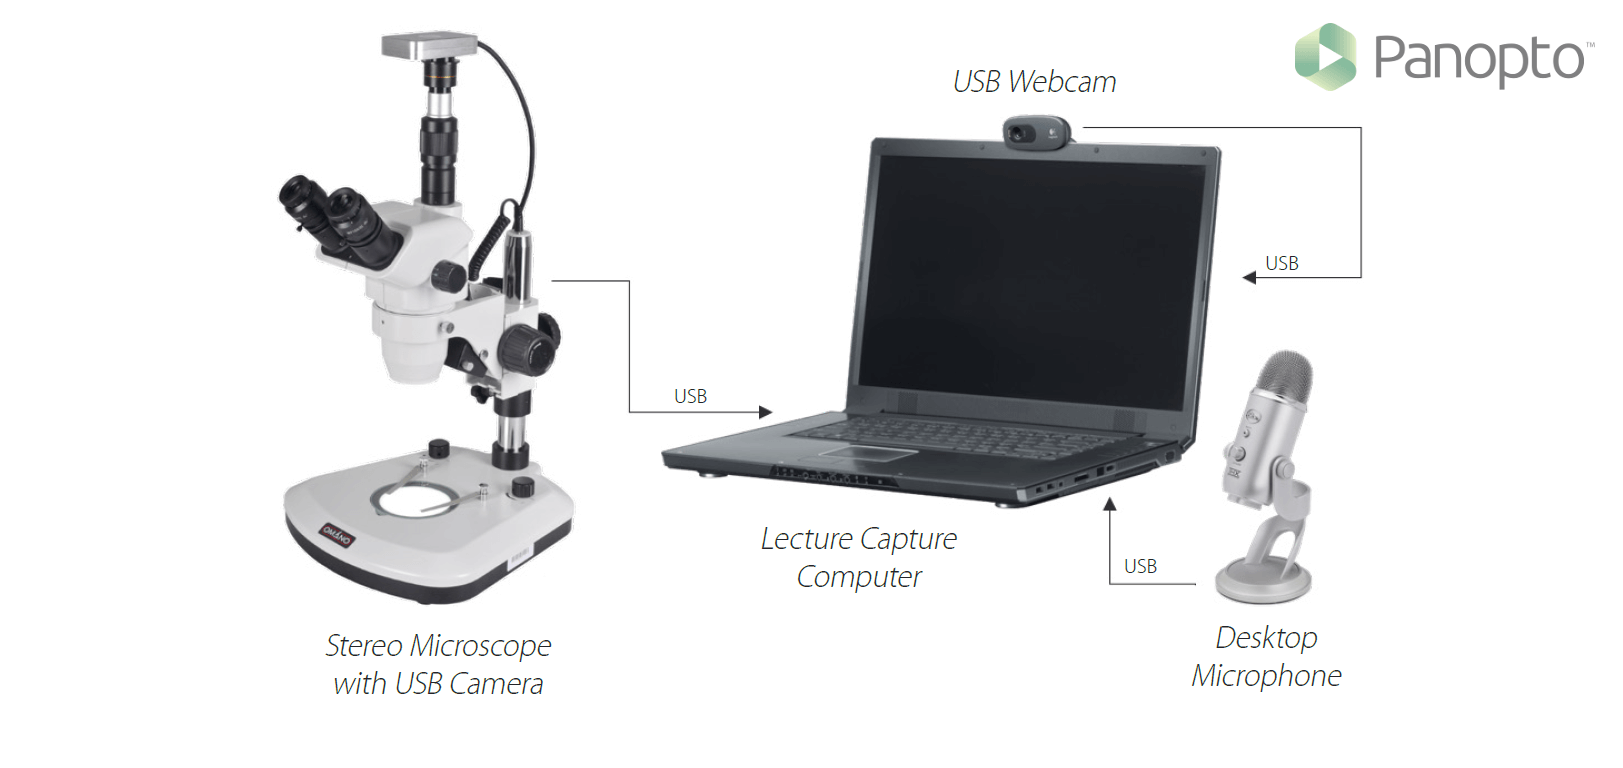
In this example, recording digital course content for a biology course, lecture capture software simply needs to be installed on the teacher’s laptop, or on a dedicated lecture capture computer in the lab.
A USB microscope camera is attached to a stereomicroscope and then connected to the laptop along with a desktop microphone. The instructor can then simply use the microscope as normal, allowing the camera to capture and share what can be seen in the viewfinder and narrating what’s in view for the desktop mic to record.
Alternatively, a smartphone or other mobile device with a lens attachment could be used to capture the microscope view. This mobile recording would then be synced with the audio and
any additional presentation content in the cloud.
Basic Lecture Capture Connections, Diagrammed: In The Lab
Sample Recording of a lecture recorded with Panopto in a lab:
EXAMPLE 7. In The Field
 In many areas of study, the latest information and cutting-edge research won’t be found indoors. Yet for dozens of valid reasons ranging from logistics to safety to cost, faculty are unable to bring students out to where today’s work is being done and new discoveries are being made. This deprives students of the opportunity to really experience a field — and may actually discourage students
from investing themselves in the subject.
If students are unable to visit educational opportunities in the field, video is an excellent means to bring the experience of the field back to the students. And while on-location recording used to be an expensive proposition, today, most faculty already have the only tool they need right in their pocket.
This example field demonstration shows how an instructor might capture digital course content using a mobile device that’s had a lecture capture app installed. In this example, an archaeology professor leads a dig in the field. She records the dig with her mobile phone, which sits on a tripod so she can move around and keep her hands free to demonstrate the dig. To ensure useable audio is captured (often the key challenge of recording in the field), the professor wears a wireless lavalier microphone that connects to the audio jack on one of her mobile phones.
While the first mobile device is positioned to capture the full context of the activity, a second mobile device can also be used to capture close-up video, or record from another angle during the dig.
All that’s required to sync the feeds is for the instructor to indicate both devices should record to the same video session when they press “record”. The lecture capture software will process everything together in the cloud.
Basic Lecture Capture Connections, Diagrammed: In The Field

EXAMPLE 8. Demonstration Spaces
 In a number of fields, performance is a crucial part of the learning process. This includes everything from student role-play activities under the supervision of an instructor (for example, where students studying elementary education might practice working with children), to actual performances in front of live audiences put on by students of the arts.
In this example, we’ll consider how to provision a space intended to allow medical school faculty to demonstrate patient interactions. This setup can also record medical students (physician assistant students, in this case) practicing working with patients, which can be reviewed and critiqued post-recording.
In demonstration spaces, the most important element of a lecture capture implementation will be ensuring there are enough cameras to capture every relevant view of the activity. If possible, there
should be at least one camera focused on each participant — that will provide the best view of each student’s performance for faculty to review and critique.
The specific video equipment needed will depend on the type of demonstration typically performed in the room. A role-play of a conversation, as in this example, may be more than adequately captured by a pair of webcams, or by the students’ own mobile devices. More detailed activities, like an artistic performance or a surgical theatre walkthrough, may benefit from higher quality
and/or specialized cameras.
Audio needs will likewise be directed by content. In our example, a desktop mic (ideally, one with a figure 8 pickup pattern) will be perfect for capturing a conversation. Other activities may benefit instead from a lapel mic to better hear
Basic Lecture Capture Connections, Diagrammed: Demonstration Spaces

EXAMPLE 9. Student Presentations
Recording student presentations and other individual assignments could potentially be considered part of the demonstration room example above, but given the rapid growth of this use case, we felt it warranted specific attention here.
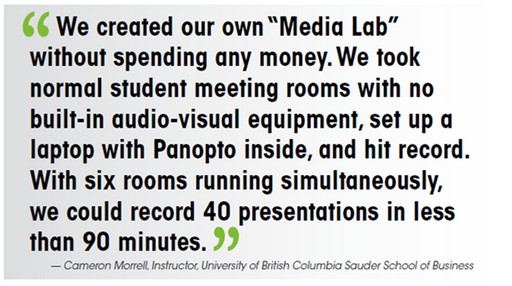 Instructors in virtually every field of study have long recognized the value of assigning students to learn about a particular detail and present their findings in class. The practice gives each student a chance to dig deeper into a given subject matter, and also helps to hone their overall research and presentation skills.
The challenge, however, has been scheduling the resulting presentations. For a simple 10-minute presentation with time for Q&A, a class of 20 students meeting for an hour three times a week would have to block almost 2 full weeks of class time just for students to present — time that can’t be used for any other teaching.
Your lecture capture system can change that equation. With a well-implemented system in place, teachers can give students the same assignments, but instead require each student to record their presentations either in a breakout room on campus or at home using their own laptop or mobile device. Instructors can review these recordings on their own schedule, without the need to dedicate class time to them — thereby freeing up more class time for instruction, activities, or even additional presentations.
The following example considers implementing lecture capture for use in a breakout room, designed to enable MBA students to practice their business pitches and improve their presentation skills.
In this case, all that’s needed is either a laptop or a mobile device, with your lecture capture software (or app) already installed. This is typically all that’s required in a small space, however, an external HD webcam and USB microphone can also be added for improved sound and video quality in the recordings. Stationing a desk lamp in the room would also ensure there is adequate lighting available, and improve the visual appearance of the final recording.
With this minimal setup in place, students can be instructed to either record their presentations into a main recording folder for their class, or into a personal video folder if available in your lecture capture solution. Once the folder is selected, students need only to press “record” and present.
Because scalability is key when provisioning spaces and equipment for student recordings, our recommendation for this use case prioritizes making it easy to repeat this setup in as many breakout rooms or other spaces as needed.
Basic Lecture Capture Connections, Diagrammed: Student Presentations

Related Reading: Recording Student Videos At Scale
The Complete Guide To Setting Up Any Room For Lecture Capture
 Get the complete guide to setting up any room on campus for lecture capture for free, now:
Download the complete guide to lecture capture anywhere.
Or check out the rest of our blog series that tackles everything you need to consider for recording lectures in any room on campus:
Three Generations Of Lecture Capture
Where And What Are You Recording (Part I)
How Are You Recording? Technical Considerations For Lecture Capture Equipment (Part II)